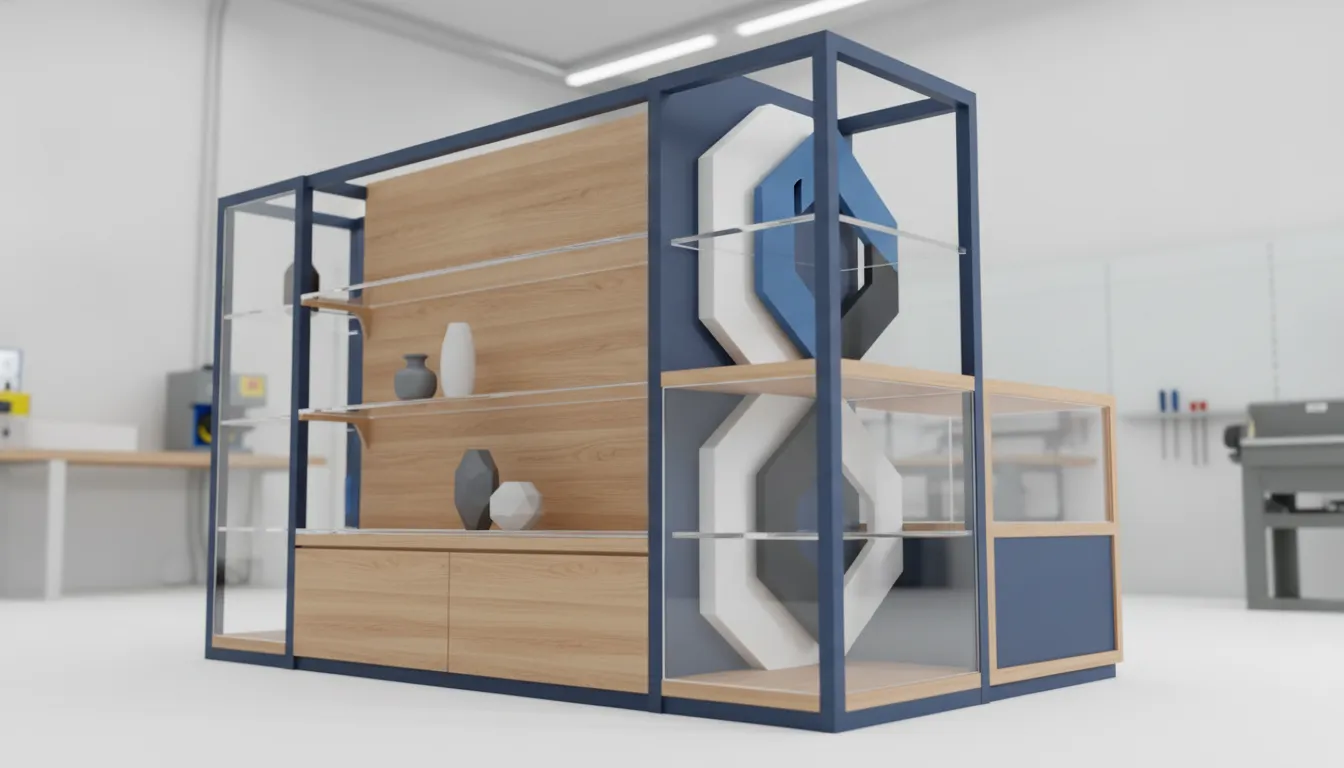


A fixture program rarely has one job. It may need to establish a recognizable brand presence, present products clearly, accommodate service or adjustment, and remain repeatable across locations. Treating every component as the same material can make one of those requirements harder to meet.
Review your custom retail fixture program with S-CUBE Fixtures
Mixed material retail fixtures combine materials according to role: wood can shape the visual and tactile experience. Metal can support structural or adjustable elements, and acrylic or glass can improve product visibility. The right combination depends on the fixture's merchandising purpose, interface details, manufacturing process, and rollout requirements.
The key is to make those choices as a coordinated system rather than a collection of finishes. Start by defining what each material needs to do, then test how the parts meet at edges, joints, shelves, panels, and display zones. That role-based approach clarifies the broader reasons a mixed-material program may serve the store better.
Short answer: Mixed material retail fixtures let one coordinated program assign different jobs to different surfaces and components. A fixture may need a durable working structure, a distinctive visual finish, adaptable merchandising elements, and a repeatable specification for multiple stores. Combining materials can address those roles more deliberately than treating one material as the answer for every part.
The decision is not simply about creating visual contrast. It is about separating the needs of the assembly. A wood-based surface may establish warmth or a brand cue, while metal may support an adjustable merchandising element. Acrylic or glass may help present products with greater visual openness. Each choice creates an interface that must be considered in the drawings, samples, prototype, and production handoff.
This approach is especially relevant to national chains, regional retailers, and multi-unit franchise businesses managing consistent fixtures across locations. The material mix should be evaluated against:
The narrower question is how those roles work together inside one assembly. Define where materials meet, how finishes are approved, and which details must remain consistent from prototype through installation.
Short answer: The strongest mixed material retail fixtures assign each material a clear job within one assembly. Separate structural support, product presentation, customer interaction, and brand expression, then coordinate the interfaces between those roles.
S-CUBE works with wood, metal, acrylic, glass, and mixed-medium materials, supported by design, engineering, and prototyping. A useful review asks: What must support the assembly? Where does the shopper need visibility or access? Which surfaces carry the visual identity? How will the combination be documented and repeated during production?
| Material role | Merchandising job | Coordination question | Caution |
|---|---|---|---|
| Primary structure or frame | Organizes shelves, panels, hooks, or display zones. | How do joints, attachment points, and service access work together? | Confirm requirements through project-specific engineering review. |
| Visual surface | Communicates brand through color, texture, finish, and touch. | Will the finish coordinate with edges, hardware, lighting, and clear parts? | Confirm appearance and intended-use performance with samples. |
| Merchandising interface | Supports placement, adjustment, access, or category separation. | Can store teams reset products without damaging adjacent materials? | Validate clearances, hardware, and operating steps with the fixture concept. |
| Transparent or protective element | Maintains visibility while defining a display boundary. | How will visibility, access, lighting, edges, and cleaning affect adjacent parts? | Review acrylic and glass choices for the specific project. |
Interfaces deserve as much attention as the materials. A wood panel meeting a metal frame, or a clear component joining a finished surface, needs defined edges, attachment logic, tolerances, and installation sequence. A Rochester Institute of Technology thesis on modular display fixture systems documents 3D models, 2D CAD drawings, prototype models, alignment blocks, panels, and multipurpose connections as design concepts. Use that as coordination context, not as a substitute for engineering validation.
For a project with several material roles in one repeatable assembly, review the requirements through custom retail fixture design. The goal is an intentional display and an unambiguous manufacturing and installation handoff.
Short answer: Use wood and wood-based surfaces to establish the fixture's visual character and tactile experience. Then coordinate their edges, finishes, and transitions with the materials doing structural or merchandising work.
In mixed material retail fixtures, wood is often the brand-facing layer. Its color, grain direction, sheen, and edge treatment can make a display feel warm, refined, technical, or intentionally utilitarian. That decision should begin with the retail environment and the customer interaction, not with a generic assumption that one wood finish fits every application.
Start by defining where the surface will be seen and touched. A broad vertical panel may need a different finish sample than a counter edge, shelf front, drawer face, or product platform. Review samples under the store's expected lighting and beside the proposed metal, acrylic, or glass. A finish that appears balanced on its own can compete with merchandise or create an awkward contrast at a material transition.
Wood surfaces need clear interface decisions wherever they meet another component. Document whether a metal frame is exposed, recessed, or visually wrapped, how an acrylic or glass element is retained, and whether fasteners, reveals, or trim are part of the design language. These details influence drawings, finish approvals, assembly, and the final handoff to manufacturing.
Pay attention to tactile cues as well. The edge a shopper encounters, the hand placement near a product, and the relationship between a textured panel and a smooth insert all contribute to perceived quality. S-CUBE's design, engineering, and prototyping support can help coordinate these choices before the program moves into production. Treat the prototype as a place to review appearance and interfaces together, rather than approving a finish in isolation.
Short answer: Metal and wire components fit best where a fixture needs a defined frame, an adjustable merchandising element, or practical access for service. Their role should be confirmed through project-specific engineering and prototype review, not assumed from the material name alone.
In mixed material retail fixtures, metal may serve as a frame, post, bracket, rail, or connection point. Wire can support hooks, baskets, dividers, product stops, or other adjustable elements. Assign these roles based on the product, display geometry, store environment, and installation method. S-CUBE identifies metal among its core custom fixture capabilities.
Interfaces deserve early attention. The team should define how a metal member joins a wood panel, how a wire accessory is retained, and which parts can be removed without disturbing adjacent finishes. A connection that looks simple in a rendering may affect drilling, fasteners, tolerances, packaging, and field assembly. Modular display research has examined alignment blocks, panels, hooks, and multipurpose connections, reinforcing the value of documenting these interface decisions during design and prototyping. Review the RIT display-fixture research for that design context.
Adjustable parts need an intentional service path. Specify where staff can reach hardware, reposition accessories, and install replacements without removing finished panels. Coordinate metal color, sheen, and edge treatment with nearby surfaces. Because customer guidance does not establish load limits or structural performance values, the project engineering team should check final assignments before production.
Short answer: Clear components help shoppers see products while allowing the fixture team to separate, protect, or spotlight merchandise. Their value depends on how they interface with structure, lighting, hardware, and service plans.
Acrylic and glass can create visual openness within a fixture that also uses wood, metal, or other opaque materials. A clear shelf, riser, divider, door, or protective panel may preserve sightlines without making the display feel visually heavy. Define what must remain visible, what needs controlled access, and where transparency supports the intended merchandising hierarchy.
Clear elements can distinguish a focal product from the fixture around it. A transparent shelf may preserve sightlines, while a clear enclosure can establish a boundary around featured merchandise. Review light sources, reflections, edges, hardware, and nearby finishes together so the clear component supports presentation rather than creating distracting lines.
Drawings should show how acrylic or glass connects to brackets, wood panels, frames, doors, fasteners, and service-access points. A prototype or representative sample can help teams review visibility, access, cleaning expectations, edge treatment, and installation sequence before production.
Glass safety, acrylic thickness, scratch resistance, and durability are project-specific specifications to validate with design and engineering teams. The available S-CUBE information confirms capability with these materials, but not universal safety, performance, or thickness rules. Document requirements in drawings, the bill of materials, finish approvals, and quality checks rather than assuming them.
Short answer: Mixed-material retail fixtures become easier to manufacture when every handoff defines how materials meet, how the finished unit is assembled, and how the approved result will be repeated across stores.
A practical sequence is:
Short answer: Document every material, finish, interface, revision, and handoff so procurement, store planning, manufacturing, and installation teams share one definition of the approved fixture.
A practical pre-production checklist should include:
For adjacent planning context, review these custom display case design choices and explore custom merchandising display options. S-CUBE supports the design, engineering, prototyping, project management, logistics, warehousing, and inventory work behind the handoff.
Plan your mixed-material retail fixture program with S-CUBE Fixtures
The best mix depends on each part's job. Wood may establish the visual layer, metal may support structural or adjustable functions, and acrylic or glass may improve visibility. Evaluate appearance, merchandising use, manufacturability, coordination, and rollout requirements together.
Define every transition during design, including fasteners, edge conditions, clearances, finish boundaries, and points that require adjustment or service. Coordinate these details in drawings, review the bill of materials, and inspect a representative prototype before production. A shared interface plan helps different manufacturing steps produce one coherent assembly.
Neither is universally better. The right choice depends on the required visibility, product protection, appearance, cleaning expectations, lighting interaction, and project-specific engineering requirements. Review the choice with the design and manufacturing teams, and validate the selected material in a sample or prototype before final approval.
A prototype lets the team evaluate material relationships before a larger production run. It can reveal alignment, access, finish, visibility, assembly, and merchandising issues that may not be obvious in a rendering. Use the review to update drawings, interface details, finish approvals, and quality checks before releasing production documentation.
Share the intended use, product dimensions, material and finish selections, approved samples, drawings, interface details, hardware, packaging, store conditions, quantities, and rollout schedule. Clear documentation gives every handoff the same definition of an approved fixture.
A coordinated review can help connect material roles, interface details, finish decisions, and manufacturing handoffs before production begins. To discuss how the pieces of your program should work together, contact S-CUBE Fixtures to review your mixed-material retail fixture program.
Subscribe for expert insights on fixture design, materials, and modern retail environments.