Creating a memorable in-store experience means moving beyond standard, off-the-shelf solutions. Your fixtures should be a direct reflection of your brand’s unique identity, but custom designs often come with manufacturing challenges. This is where 3D prototyping opens up a world of creative possibilities. The technology makes it easier and more cost-effective to experiment with complex shapes, intricate patterns, and innovative features that would be difficult to produce with traditional methods. It gives you the freedom to design truly one-of-a-kind displays that capture customer attention and set your retail environment apart from the competition, turning a simple fixture into a powerful branding tool.
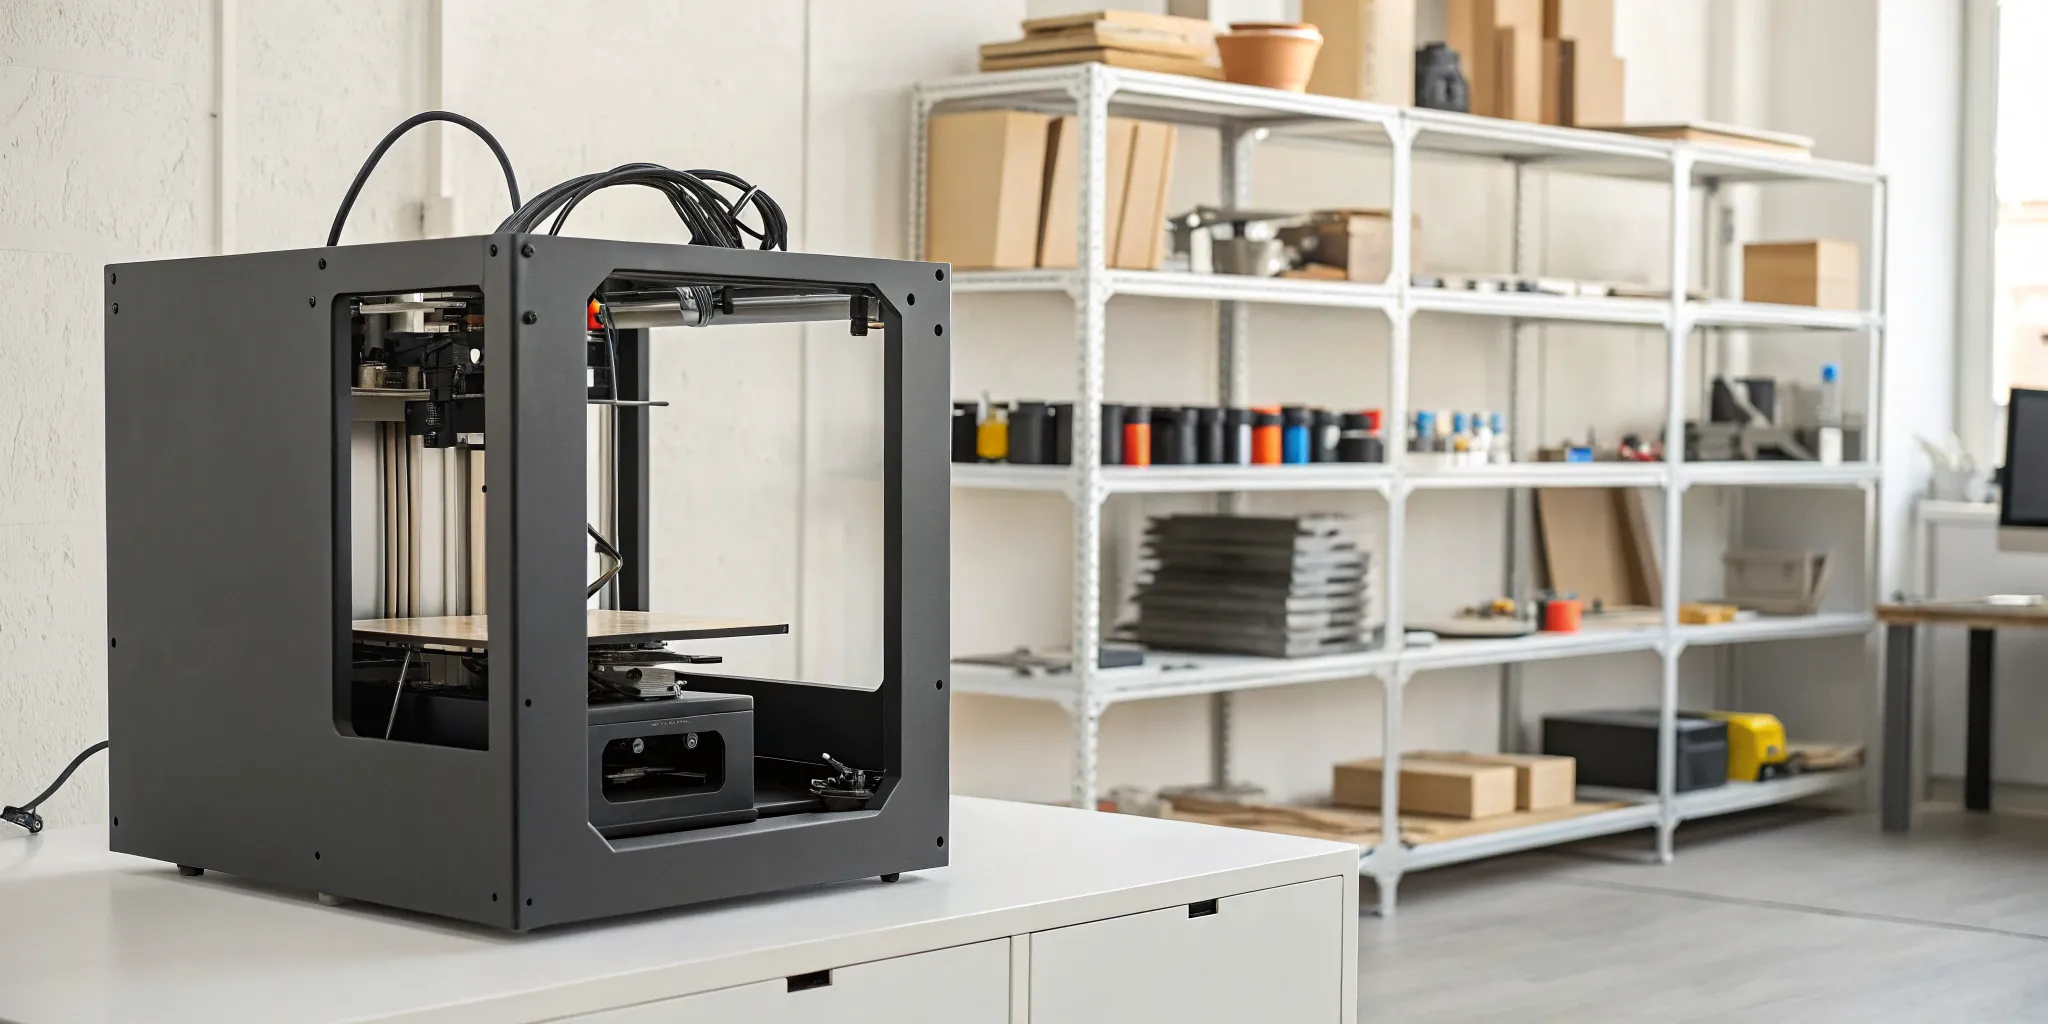
Think of 3D prototyping as a way to bring your ideas to life, turning a digital concept into a physical object you can hold in your hands. It’s a game-changing process that lets designers and engineers create tangible models from their digital files, quickly and affordably. The magic behind it is 3D printing, also known as additive manufacturing, which builds a prototype layer by layer. For anyone developing custom retail fixtures, this is a huge advantage.
Instead of waiting weeks or months for a traditionally made model, you can get a physical prototype in a matter of days, or even hours. This speed allows your team to test, touch, and refine a new display or fixture before committing to the expense and time of mass production. It’s a crucial step in our design, engineering, and prototyping service, as it helps catch potential design flaws early, saving you significant time and money down the line. Essentially, 3D prototyping bridges the gap between imagination and reality, ensuring the final product is exactly what you envisioned.
The journey from a digital file to a physical prototype follows a few straightforward steps. It all starts with a 3D model created in computer-aided design (CAD) software. Once the design is finalized, it’s converted into a file format that a 3D printer can read. Special software then "slices" the model into hundreds or thousands of thin horizontal layers.
From there, the 3D printer gets to work, building the object one layer at a time from materials like plastic, resin, or even metal powders. After the print is complete, you have a physical prototype ready for review. Your team can test it for form and function, gather feedback, and make any necessary tweaks to the digital design. This ability to iterate quickly is what makes the process so powerful.
A 3D printed prototype is a tangible version of your digital design, transforming an idea on a screen into a real-world object. This is incredibly valuable in the retail world, where seeing and feeling a fixture is essential to understanding how it will function in your store. It gives you a clear picture of the scale, aesthetics, and usability of your custom retail fixtures.
Unlike older prototyping methods that relied on slow, labor-intensive techniques like machining or hand-carving, 3D printing is much faster and more cost-effective for creating one-off models. It removes the need for expensive molds or specialized tooling, which is perfect for testing new concepts. This efficiency helps you innovate and adapt your store displays to keep up with changing trends and customer expectations.
When you're planning a multi-store rollout, there’s little room for error. 3D prototyping moves your fixture designs from a concept on a screen to a physical object you can hold in your hands. This step is more than just a cool piece of tech; it’s a practical tool that bridges the gap between imagination and reality, ensuring your vision translates perfectly to the store floor. By creating a tangible model early on, you can see, touch, and test your ideas before committing to the time and expense of mass production.
This process allows you to refine every detail, from the overall dimensions to the feel of the materials. It’s your chance to catch potential issues, gather valuable feedback from your team, and confirm that the final product will meet your exact specifications. For retailers managing complex projects with tight deadlines, this isn't a luxury—it's a crucial part of a smart, efficient workflow. Integrating 3D prototyping into your project management plan de-risks the entire process, saving you from costly surprises down the line and giving you the confidence that your fixtures will be right the first time.
Traditional prototyping methods can take weeks, creating bottlenecks that slow down your entire project timeline. 3D prototyping completely changes the pace. You can turn a digital design file into a physical model in a matter of hours or days, allowing for incredibly fast iteration. Imagine you’re developing a new point-of-purchase display. You can print a model, share it with your team for feedback, make adjustments in the design software, and have a revised version ready by the next day. This rapid cycle of feedback and refinement helps you finalize designs faster, make decisions with confidence, and keep your store rollout on schedule.
A small oversight on a digital blueprint can become a massive, expensive problem once you’ve manufactured hundreds of units. This is where prototyping is invaluable. Holding a physical model makes it easy to spot design flaws you might have missed on screen, like incorrect measurements, a clunky user interaction, or a weak point that could affect durability. Our store fixture prototyping services help you identify and fix these issues at the most cost-effective stage. Correcting a design before you invest in tooling and materials prevents waste, saves your budget, and ensures the final product is flawless.
If you can design it, 3D printing can likely build it. This technology opens the door to creating intricate shapes and complex geometries that would be difficult or prohibitively expensive to produce with traditional methods. For retailers looking to create a unique and memorable brand environment, this is a game-changer. You can design custom fixtures with unique curves, integrated branding elements, or specialized functions that perfectly fit your products and your space. This freedom allows you to move beyond standard solutions and develop truly innovative displays that capture customer attention and effectively solve your retail challenges.
A prototype isn’t just for show—it’s for testing. A physical model allows you to validate every aspect of your fixture’s design in a real-world context. You can place it in a mock store environment to check sightlines, test how it holds merchandise, and see how customers interact with it. This hands-on testing provides critical insights that you simply can’t get from a computer screen. It’s also the best way to get clear, actionable feedback and secure buy-in from key stakeholders before moving forward. Seeing successful past projects often starts with this crucial validation step.
Once you’ve decided to use 3D prototyping, the next step is to pick the right technology for the job. Not all 3D printers are created equal, and the best method depends entirely on what you want to achieve with your prototype. Are you testing a simple shape, a complex design, or a functional part that needs to be durable? Understanding the key differences between the most common technologies will help you and your design partner make the right call for your retail fixture project. Let's look at three popular options.
Think of FDM printing as a high-tech hot glue gun. This widely used technology works by melting and extruding a thermoplastic filament, building your prototype layer by tiny layer from the ground up. FDM is a fantastic choice for creating low-cost, basic models quickly. It’s perfect for the early stages of design and prototyping when you need to confirm the size, shape, and scale of a fixture without investing too much time or money. If you just need a simple physical representation of your idea to hold in your hands, FDM is often the most practical and efficient way to get it done.
If your design requires fine details and a smooth, polished finish, SLA is the way to go. This technology uses a UV light to cure liquid resin into a solid object. The result is a highly precise prototype with an appearance that closely resembles a finished product. SLA is ideal for creating fixtures with intricate patterns, complex curves, or detailed branding elements. Because of its high resolution, it’s the preferred method for rapid prototyping applications where visual aesthetics and precision are critical. This allows you to accurately visualize how your final display will look and feel in your retail environment.
When strength and durability are top priorities, SLS is the leading choice. This method uses a powerful laser to sinter (or fuse) powdered materials, like nylon, into a solid, robust part. The resulting prototypes are strong enough to function like the final product, making them perfect for testing moving parts, snap-fit components, or any fixture that needs to withstand physical interaction. If you need to create a functional prototype that can be handled, tested, and put through its paces, SLS provides the durability required for real-world validation before committing to full-scale manufacturing.
Selecting the right 3D printing method comes down to your project's specific needs. To make the best choice, consider what your prototype needs to accomplish. Ask yourself: How precise does it need to be? Does it need to be strong enough to handle customer interaction? What kind of surface finish are you looking for? Each technology offers unique advantages, and the right material will depend on your answers. By clearly defining your goals for the 3D printed prototype, you can ensure the final model meets your expectations for quality, function, and appearance.
One of the biggest decisions you’ll make is whether to handle 3D prototyping yourself or to work with a specialized partner. Bringing the process in-house gives you direct control, but outsourcing can provide access to a wider range of technologies and expertise. The right choice really depends on your team’s resources, the complexity of your fixtures, and the scale of your retail rollout. For a simple, one-off display, an in-house printer might be all you need. But for a complex, multi-component fixture destined for hundreds of stores, the equation changes. Let’s break down the key factors to help you decide which path makes the most sense for your business.
The biggest advantage of in-house 3D printing is speed, especially for quick, one-off models. You can design a component, print it overnight, and test it the next morning. This rapid feedback loop is fantastic for making small adjustments on the fly. However, the DIY approach comes with its own set of challenges. The initial investment in professional-grade equipment can be substantial, and you’ll also need team members with the skills to operate and maintain the printers. For large-scale retail rollouts, ensuring consistency and quality across dozens of prototypes can quickly become a major operational hurdle, pulling focus from other critical tasks.
Working with a prototyping partner is like adding a team of specialists to your project. You immediately gain access to a variety of industrial-grade printing technologies and materials without the hefty price tag of purchasing the equipment yourself. An experienced partner provides comprehensive design, engineering, and prototyping services, ensuring your fixture is not only visually appealing but also structurally sound and ready for manufacturing. They handle the entire process, from refining your digital model to delivering a high-quality physical prototype. This frees up your team to focus on the bigger picture of your retail environment while experts manage the technical details.
At first glance, the per-part cost of DIY printing can seem lower. However, that number often doesn’t include the total cost of ownership—the machine itself, materials, maintenance, and the payroll hours for the employees running the prints. When you factor everything in, the costs can quickly add up. Outsourcing provides a clear, upfront cost and eliminates the risk of failed prints and wasted materials. While a single in-house print might be faster, a dedicated partner with streamlined project management can often deliver complex or high-volume projects more efficiently, preventing internal bottlenecks and ensuring your rollout stays on schedule.
Moving from a digital concept to a physical store is a huge leap. 3D prototyping bridges that gap, turning abstract ideas into tangible objects you can see, touch, and test. It’s more than just a step in the design process; it’s a strategic tool that fundamentally changes how you develop your retail environment. By creating a physical model early on, you can refine your vision, test functionality, and ensure every fixture and display is perfectly suited to your space and your customers.
This hands-on approach allows you to experience your designs in the real world before committing to a full production run. You can assess scale, test materials, and see how a new display interacts with your store’s lighting and layout. This process eliminates guesswork, reduces the risk of costly errors, and empowers your team to make smarter, more confident decisions. It's the difference between hoping a design works and knowing it will. By validating your concepts with physical prototypes, you can move forward with manufacturing with complete confidence, knowing that the final product will meet your brand standards and business objectives. Ultimately, 3D prototyping helps you create a more cohesive, effective, and engaging retail space that truly reflects your brand, ensuring your investment delivers the impact you envisioned from the start.
A 2D drawing or a digital render on a screen can only tell you so much. A physical prototype brings your vision to life, providing a true sense of scale, proportion, and presence that images can’t capture. Prototyping is essential for visualizing and testing retail display concepts, allowing your team to see exactly how a fixture will look and feel in your store. You can evaluate its height, footprint, and how it fits within the customer journey.
This tangible interaction is crucial for making informed decisions. Is the finish right? Does the material feel premium? Is the branding visible from across the aisle? Holding a physical model answers these questions instantly. S-CUBE’s design and prototyping services help you catch potential issues early, ensuring the final product aligns perfectly with your expectations and avoids expensive surprises during manufacturing.
Your store fixtures aren’t just there to hold products; they’re a key part of the customer experience. 3D prototyping lets you test how shoppers will actually interact with your displays. You can simulate the shopping experience by placing products on the prototype, checking for accessibility, and ensuring the design guides the customer’s eye exactly where you want it to go. This is your chance to think like a shopper and refine the design for maximum engagement.
This iterative process allows you to fine-tune every detail before you commit to a large-scale rollout. By creating and testing physical models, you can quickly identify what works and what doesn’t, reducing design cycles and ensuring the final fixture is both beautiful and functional. It’s about creating a seamless, intuitive experience that makes shopping easier and more enjoyable for your customers.
If you can dream it, 3D prototyping can help you build it. This technology makes it easier and more affordable to experiment with complex shapes, unique materials, and innovative designs that set your brand apart. Instead of being limited by traditional manufacturing constraints, you can explore intricate patterns, organic curves, and other custom elements that truly capture your brand’s identity. This freedom allows you to create one-of-a-kind fixtures that stop customers in their tracks.
Prototyping also supports sustainability by reducing waste. Creating a small-scale 3D model is far more efficient than building a full-size traditional prototype that might end up in a landfill. This approach lets you perfect your custom fixture programs while minimizing your environmental footprint and keeping development costs in check.
Getting everyone on the same page can be one of the biggest hurdles in any retail project. A physical prototype is a powerful tool for clear communication. It’s much easier to get enthusiastic approval from executives, marketing teams, and other stakeholders when they can hold the design in their hands. A tangible model eliminates ambiguity and ensures everyone shares the same vision for the final product.
Presenting a well-executed prototype builds confidence and streamlines the entire approval process. It demonstrates that you’ve tested the concept, considered the materials, and confirmed the functionality. This proactive approach helps you catch potential design flaws early, preventing costly mistakes down the line. With everyone aligned, you can move from concept to full-scale production faster and with greater assurance, supported by clear project management.
Once you’ve decided to use 3D prototyping, the next step is to pick the right method for your project. The best approach depends entirely on your goals. Are you testing the strength of a new shelving bracket or just checking the visual appeal of a POP display? Answering a few key questions about your project’s needs will help you and your design partner select the technology, materials, and process that will deliver the best results without wasting time or money. Think of it as creating a roadmap before you start the journey—it ensures you get exactly where you need to go.
First, think about what your prototype needs to do. If it’s a purely visual model meant to show the shape and size of a fixture, a basic, cost-effective plastic might be perfect. But if you need to test the fixture’s function—like seeing how much weight a shelf can hold or if a drawer slides smoothly—you’ll need a material that mimics the final product’s strength and durability. Modern 3D printing technologies can produce parts in a huge range of materials, from flexible resins to robust, industrial-grade polymers. The goal is to match the material to the test, ensuring your prototype gives you the accurate feedback you need to move forward with confidence.
How closely does your prototype need to match the final look and feel of your retail display? For some projects, a rough model is enough to confirm dimensions and placement. For others, especially customer-facing displays, the surface finish and level of detail are critical. Some printing methods excel at creating ultra-smooth surfaces and intricate designs, making them ideal for visualizing how a final product will look under store lighting. Prototyping is essential for testing retail display concepts and catching aesthetic issues early, ensuring the final piece aligns perfectly with your brand’s standards.
Your schedule and the number of prototypes you need will heavily influence your approach. If you need a single model quickly to get stakeholder approval, a rapid prototyping method is your best bet. However, if you’re planning a multi-store rollout, you might need several iterations to refine the design. Working with an experienced partner helps you catch design flaws early and test functionality and materials to prevent costly mistakes, especially when you’re on a tight timeline. A well-managed prototyping process builds in time for these crucial refinements without derailing your launch date.
Finally, it all comes down to your budget. The cost of 3D prototyping can vary widely based on the technology, materials, and complexity of the design. While it might be tempting to choose the cheapest option, it’s important to consider the long-term value. Investing in a high-quality prototype that accurately reflects your design can save you a fortune by preventing a costly production error down the line. A good partner will help you find the right balance, leveraging their expertise and resources to deliver the best possible solution for your budget. This iterative testing process is key to streamlining costs and ensuring a successful final product.
Isn't a 3D computer model good enough? Why do I need a physical prototype? A digital model is a fantastic starting point, but it can't tell you how a fixture will feel or function in a real-world setting. A physical prototype allows you to test its stability, see how it interacts with your store's lighting, and check if it's truly easy for customers to use. It moves your design from theory to reality, revealing practical issues like awkward angles or weak points that you would never spot on a screen.
How long does it typically take to get a 3D printed prototype? The timeline is much faster than you might think. Simple models can often be printed in just a day or two, while more complex designs might take a bit longer. The real advantage is the speed of iteration. Instead of waiting weeks for a traditionally made model, you can get a revised prototype in your hands within days, which keeps your entire project moving forward without long, costly delays.
Is 3D prototyping only for complex or high-end custom fixtures? Not at all. While it's brilliant for creating intricate designs, it's just as valuable for seemingly simple fixtures. Prototyping can be used to test the strength of a standard bracket, confirm the fit of a basic shelf, or ensure a sign holder is the perfect size. It helps prevent small, overlooked errors that can become big, expensive problems during a large-scale rollout, no matter how simple the fixture seems.
What do I need to provide to get a prototype made? The process usually starts with a 3D digital file, like one from CAD software. However, you don't need to be a design expert to begin. If you just have a concept, a sketch, or a list of functional requirements, a good partner can work with you to develop the digital design first. The most important thing is to have a clear idea of what you want the fixture to accomplish in your store.
How does a single prototype help when I'm planning a rollout for hundreds of stores? That single prototype serves as the "master" version that gets perfected before you commit to mass production. By testing and finalizing one physical model, you approve every single detail—from the dimensions to the material finish. This ensures that every one of the hundreds of fixtures produced will be identical and correct, eliminating the risk of discovering a flaw after the first 50 units have already been shipped.
Subscribe for expert insights on fixture design, materials, and modern retail environments.